Aantal spelers: 2-4
Speelduur: 40-80 minuten
Leeftijd: Vanaf 12 jaar
Auteur: Meng Chunlin
Uitgever: White Goblin Games
Jaar: 2024


Dit is een herpublicatie van een review die ik eerder schreef voor bordspelwereld.nl
Daar is er weer één. Een workerplacement-puntensalade met een prachtig hysterisch speelbord: Explorers of Navoria. Het zal je niet verbazen dat het doel is om Navoria te gaan “exploren” en hiermee zoveel mogelijk punten bij elkaar te sprokkelen.
Met deze review ben ik een beetje “late to the party”, maar hij is broodnodig. Ik geef graag wat tegengeluid aan veel critici die vinden dat er te weinig te exploren valt. Tsja wanneer dát enkel is wat je wilt en je hoop daar volledig op gevestigd is gezien de titel van het spel, dan kom je inderdaad ietwat bedrogen uit. Echt exploren is het niet. Exploren pretendeert dat je steeds iets nieuws ontdekt. En dat doe je niet. Je hebt juist een recht toe-recht aan kaart/speelveld, dat tijdens het spelen niet aan verandering onderhevig is of ontdekt wordt. Exploren moet je meer zien als het bord bewandelen en dat is wel echt een andere lading van het woord. Al deze kritiek “aside” en na het nodige verwachtingsmanagement, blijft er wat mij betreft een workerplacement over die qua keuzemogelijkheden goed in balans is, doet wat hij moet doen, er prachtig uit ziet en bovendien ook nog eens enorm herspeelbaar is door wisselende componenten op het speelbord, zeker met de uitbreiding. En ik leg graag uit waarom!
Mijn eerste potje speelde ik toen ik aangeschoten op een vriendenweekend was met mede reviewers. Ik moet eerlijk bekennen dat ik alleen maar dacht: wauw, mooi! Moe als ik was kon ik me nauwelijks concentreren, dus ik dacht: ik focus me even op één ding. De kaarten. Onderdeel van dit spel is set-collection. En de kaarten die er lagen sloten perfect aan bij de getrokken doelen voor deze pot en zorgden tussen de rondes door voor extra inkomsten. Mijn toenmalige breincapacitiet kon dat stukje nog aan en ik won met deze single focus. De euforie veranderde in de wens om het spel ook te hebben, en zo geschiedde. Een volgend potje bleef niet lang uit en….. ik ging roemloos ten onder. Mijn eerdere succesvolle strategie werkte niet. En eigenlijk was dat ook wel logisch. Ik deed niet wat je moet doen bij een goede worker-placement: het optimale uit de veranderlijke factoren halen. Er lagen hele andere doelen, er lagen hele andere kaarten en dit potje vroeg om een hele andere strategie en inzet van de (net zo veranderlijke) werkers. Nou, dan weet je al dat de makers het in de basis sowieso al goed begrepen hebben! De keuze is reuze (maar overzichtelijk)! Ik hou er van.
Wel nu. Hoe was je dit varkentje?
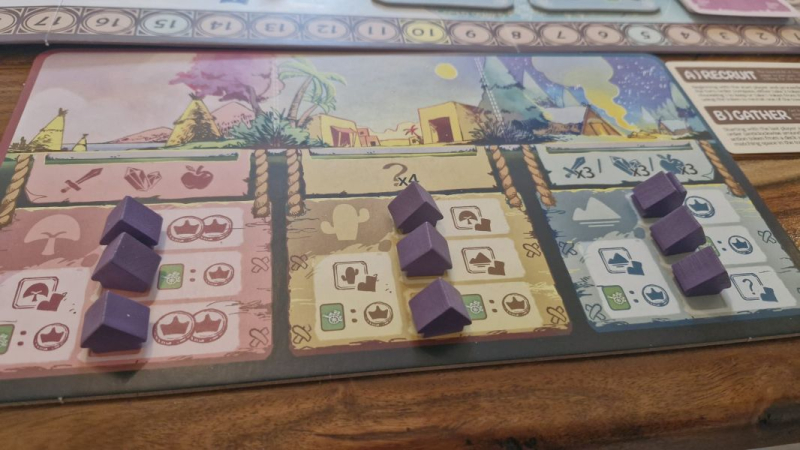
Voor je zie je een bord met verschillende tracks. Deze kun je gedurende het spel bewandelen mits je deze actie weet te activeren. De tracks leveren punten én bonussen op bij tussentijdse scoringen en jw bouwt er huisjes die volgende rondes voordelen opleveren. In het midden zie je verschillende landschappen waar grondstoffen, punten en acties te bemachtigen zijn en aan de zijde van het bord vind je kaarten in verschillende categoriën die allen hun eigen werkingen hebben. Grondstoffen zijn belangrijk om bonussen te activeren op je persoonlijke spelersbordje die op hun beurt ook weer extra acties en scoringsmogelijkheden opleveren. Tot slot vind je boven aan het bord verschillende doelen. Deze doelen scoor je enkel wanneer je op tijd een juiste set kaarten weet te bemachtigen. Doe je dat als eerste levert dit namelijk meer op dan voor een ieder die volgt.
Explores of Navoria wordt gespeeld in verschillende fases, die allemaal hun eigen functie hebben. Het spel bestaat uit drie rondes, waarin alle vier de fases voorbij komen in dezelfde volgorde.
- A) Recruit
In een zakje zitten fiches die corresponderen met de verschillende kleuren van de kaarten. Deze fiches ga je gebruiken om aan te geven uit welke rij kaarten je een kaart wil pakken. Je bent afhankelijk van de fiches die je zelf trekt, maar óók van de fiche die je voorganger eventueel heeft laten liggen. Je mag namelijk óf twee blinde fiches trekken uit de zak óf er een pakken vanaf het midden van het bord. Uit de twee fiches die je trekt kies je er namelijk één en laat je er één achter in het midden van het veld. Die in het midden van het veld wordt dus een keuze/optie voor de spelers ná jou. Het getrokken fiche leg je op de gedekte stapel van de corresponderende kleur kaarten. Van die kleur liggen drie kaarten open in de markt en kies je er één. De verschillende kaarten verschillen in functie. De ene kleur geeft je meer grondstoffen, de ander punten bij een tussentijdse telling of juist aan het einde van het spel, weer anderen laten je lopen op de sporen. Op de kaarten staan icoontjes. Deze icoontjes corresponderen met de doelen van het spel. Wil je een extra eindtelling activeren zul je hier sets mee moeten maken van deze icoontjes. Wanneer je dat lukt voldoe je aan de voorwaarde om een doel te mogen scoren. Deze doelen zijn altijd anders en gaan altijd over combinaties van kleuren kaarten. Deze komen niet noodzakelijkerwijs overeen met de icoontjes, dus je moet strategisch kiezen. De icoontjes staan namelijk niet persee op de kleuren kaarten behorende bij het doel dat voor die icoontjes getrokken is.
Mijn eerste potje waar ik aan refereerde had ik dus geluk. Ik spaarde icoontjes die me punten opleverde bij zowel de tussentijdse telling als eindtelling, die voldeden aan de doelen, en de doelen vroegen precies om de kleur kaarten waar de meeste van mijn icoontjes op stonden. Dan heb je een machtige machine gebouwd die op alle fronten scoort. Maar inmiddels weet ik dus: dit is eerder uitzondering dan de regel, want zit spel zit zo vernuftig in elkaar dat je veel beter over je keuzes na moet denken.
- B) Gather
Er is nog een belangrijke factor die meespeelt in het kiezen van je fiches. In de volgende fase veranderen deze fiches in werkers. Afhankelijk van het aantal spelers trek je een aantal keer om en om in spelersvolgorde zo’n fiche en dus een kaart. Maar wanneer dit klaar is gaan we over naar de Gather-fase waarin we in tegengestelde richting de geplaatste fiches weer van de kaartstapels af halen en deze mogen plaatsen op de kaart om van alles te “gatheren”. Je plaatst ze op het landsdeel met de corresponderende kleur. Wil je dus in de B-fase een bepaalde actie activeren, dan zul je dus moeten zorgen dat er in de Recruit-fase ook daadwerkelijk een dergelijke werker wordt gerekruteerd en vervolgens moet je hopen dat je die als eerste weet te bemachtigen. Je speelt deze fase enkel met de werkers die in fase A zijn gerekruteerd. AHA! Verklaart meteen de naam. Ook hier zul je zien dat je strategisch moet kiezen omdat elk land zijn eigen opbrengst heeft, maar ook aflopend in waarde. Soms worden er meerdere werkers van één kleur gerekruteerd, maar de gene die in deze fase al eerste een kleur speelt, zal een hogere opbrengst genieten. De volgorde waarin je de werkers inzet is dus ook belangrijk. Ga je eerst voor het land met de hoogste opbrengst, maar met het risico dat je beurt daarna een andere belangrijke kleur als is weggespeeld, met minder hoge maar wel nodige opbrengst, of andersom? Het leuke aan deze ronde is dat deze tegen de spelersvolgorde in gebeurt. De laatste speler uit fase A is startspeler in fase B en vice versa.
- C) Income
Wanneer alle werkers zijn gespeeld ga je je eigenlijk klaar maken voor de volgende ronde. Maar eerst nog een zorgvuldige administratie en punten binnen harken. Heb jij namelijk in de Recruitfase kaarten gekocht die zorgen voor tussentijds inkomen, dan is dit je moment om die kaarten te incasseren. Dit inkomen varieert van punten voor bepaalde icoontjes tot bijvoorbeeld huisjes die je gebouwd hebt op de tracks of bijvoorbeeld het aantal vlaggetjes die je gepasseerd bent op de tracks. De kaarten blijven geldig voor alle rondes en kunnen dus gedurende het spel steeds meer waard worden. In deze fase krijg je ook inkomen uit de verschillende tracks. Afhankelijk van hoever je gekomen bent op een track ontvang je bonussen. Die natuurlijk óók weer variëren. Van punten per kleur kaart die je bezit, tot random punten. In dit spel staat inkomen voor punten. Er is geen sprake van munten of fysiek geld. Laat je dus niet misleiden door de fasetitel.
- D) Return
De fase draait om het voorbereiden van de volgende ronde. Hierin zijn een aantal stappen belangrijk:
- 1. Je zo gehete exploration-markers op de tracks gaan weer terug naar het begin van het track óf naar het laatst gebouwde huisje op het track. Het lopen op de tracks en het bouwen van deze huisjes kom je als acties tegen op zowel de kaarten als op het veld, als op je persoonlijke bordje. Wanneer je dus een huisje hebt begin je een volgende ronde dus met een voorsprong, tenzij je medespelers hetzelfde huisje hebben. Doordat huisjes op specifiek aangegeven plekken op het track komen, kan het zelfs zo zijn dat je een volgende ronde verder op het track begint, dan waar je deze ronde bent geëindigd.
- 2. Alle fiches gaan weer terug in de zak
- 3. Alle markten worden vernieuwd
- 4. De spelersvolgorde wordt aangepast. Deze laatste actie is tricky. De speler die vóór staat mag beginnen, de gene die tweede staat daarna etc. Vanuit de perceptie dat het bij veel spellen voordelig is om als eerste te mogen beginnen, lijkt dat ietwat oneerlijk. Sta je al voor, krijg je ook nog voordeel. Veel mensen vallen hier ook over. Máár, persoonlijk zie ik dit anders. Wie als eerste begint heeft als eerste de kans om iets te pakken. Maar kansberekening technisch betekent dit juist ook de minste kans om de gewenste of gehoopte kleur te trekken. Terwijl voor de laatste speler wellicht al wat leuke kleurtjes zijn klaar gelegd in het midden van het veld én de kans om de gewenste kleur te trekken statistisch behoorlijk is gestegen. Vergeet daarbij niet dat de speler die als laatste is, in fase B als éérste mag beginnen met het plaatsen van de werkers en hiermee dus in het gewenste gebied de hoogste opbrengst kan gaan halen én de eerste keuze heeft.
Na de laatste ronde wordt de returnfase natuurlijk niet meer gespeeld. Maar ga je over naar de final scoring. Hier tel je na de inkomensfase ook de kaarten die scoren bij de final scoring én je telt de behaalde punten van de doelen. De speler met de meeste punten wint.
- Grondstoffen en persoonlijke bordjes
Deze behoeven nog een aparte uitleg. Ik kan me voorstellen dat je inmiddels denkt: waar zijn die grondstoffen dan voor? Logische gedachte zou zijn: daar bouw je de huisjes mee. Nou, nee. Maar ze houden wel verband met elkaar. Iedereen heeft een persoonlijk bordje waarop die de in het spel te plaatsen huisjes plaatst. Op je persoonlijke bordjes heb je hiervoor drie vakjes, die corresponderen met de drie tracks op het veld. Wanneer je op welke manier dan ook een huisje mag plaatsen, pak je een van de huisjes van je persoonlijke bord, uit het gebied gelijk aan het gebied waar je op het bord je huisje plaatst. De huisjes op je persoonlijke bordje staan gekoppeld aan een bonus. Deze bonus unlock je zodra het gekoppelde huisje van jouw persoonlijke bordje verplaatst naar het grote spelbord. Deze bonus krijg je niet direct, maar pas wanneer je de juiste grondstoffen hebt weten te verzamelen. Zodra je dat doet, activeer je vrijgespeelde bonussen, die weer bestaan uit extra stapjes op tracks, punten of extra huisjes. Wanneer je in één gebied meerder huisjes wegspeelt (max 3) en dus meerdere bonussen vrijspeelt, kan dit behoorlijk oplopen. Omdat je dan álle vrijgespeelde bonussen krijgt. Dit krijg je diréct zodra je de vereiste grondstoffen bij elkaar hebt gespaard. Je grondstoffen inwisselen is een verplichte actie. Je kan dus niet meer grondstoffen verzamelen of wachten met de bonussen tot een bepaalde fase. De juiste combinatie grondstoffen = meteen bonussen afwikkelen. In het spel heb je drie grondstoffen: appels, zwaarden en kristallen. Zodra je in het spel op welke manier dan ook grondstoffen vergaart, leg je deze op je persoonlijke bordje. Grondstoffen spaar je zogezegd per gebied/track, dus deze hebben ook elk hun eigen voorraad op je bordje. Elke gebied vraagt om een andere combinatie om de bonussen te mogen activeren. Je moet dus goed kijken in welk gebied je je grondstoffen legt. Je mag nooit in één beurt meerdere grondstoffen in hetzelfde gebied op je bordje leggen. Vergaar je dus drie grondstoffen, dan leg je deze dus allemaal in een ander gebied. Ook wanneer je drie dezelfde grondstoffen verkrijgt, moeten deze dus allemaal in een ander gebied/voorraad geplaats worden.
Uitbreiding: Forgotten Lands
Wanneer je bekend bent met het mechanisme van het basisspel, kun je er voor kiezen om Forgotten Lands toe te voegen. Eerlijkheid gebied mij te zeggen dat ik hem bij ervaren spelers stiekem al direct aan toevoeg en uitleg alsware het het basis spel is. Maar dit hoeft natuurlijk niet. Wat de uitbreiding nog toevoegt:
- Uitbreiding naar vijf spelers
- Een solo-module
- Een extra kleur kaarten, en hierbij dus ook extra kleur tokens en een nieuw landgebied, welke je toevoegt aan het speelbord. Deze kaarten beschikken niet over een icoontjes, maar wél over twee kleuren die beide afzonderlijk van elkaar tellen. Wat hard kan gaan in tussentijdse tellingen en de eindbonussen.
- Extra grondstoffen: contractjes. Deze krijg je middels de nieuwe kaarten en heb je nodig om je eigen extra acties uit te mogen voeren
- Een eigen capaciteit, die je aan het begin van het spel trekt en die jouw extra eigen acties geeft die je kan doen tegen betaling van de contractjes. Ze zijn gekoppeld aan specifieke fases in het spel en denk bij bonus bv aan extra grondstoffen of stapjes op sporen. Deze acties mogen éénmalig per ronde
- Bonuskaart: Een bonus in het spel. Veelal een starbonus waardoor je bijvoorbeeld al begint met een gratis kaart of grondstoffen, maar sommige leveren ook iets op gedurende het spel of bij de eindtelling. Iedereen krijgt een persoonlijke kaart.
- Doelenkaarten: los van de eindtelling doelen die het spel al had, trek je per ronde nog een kaart die na elke ronde voor iedere speler gescoord wordt. Je grootte van je bonus is dan op basis van je prestatie. Dus hoe meer je van iets hebt, hoe meer het oplevert
- Exploration-Tiles. Deze zorgen voor nieuwe tellingen van de verschillende tracks. Deze worden hiermee dus ook variabel en ze betreffen niet alleen maar punten zoals in het basisspel, maar kunnen bijvoorbeeld ook contracten opleveren
- Soorten tokens. Aan het einde van elk spoor leg je een token met één van de icoontjes die je ook op de kaarten en de doelen vindt. De gene die als eerste het einde van een track haalt krijgt deze token en kan deze dus mee rekenen in zijn telling voor de doelen.
Wat vind ik er van?
Ik vind dat alle zuurpruimen die vinden dat er te weinig te exploren valt, even over het woorddrempeltje heen moeten stappen, de uitbreiding er bij moeten pakken en het nog ene keer moeten spelen. Het spel zit gewoon goed in elkaar. Gelukkig zijn ook veel mensen met mij. Samenhangende elementen, de paarden waar je op moet wedden, de verschillende routes om daar te komen, het zit gebalanceerd en gelaagd in elkaar. Voor een doorgwinterdere speler die van zwaardere spellen houdt zal de basis aan de simpele kant zijn en zal het wellicht aanvoelen als een vrij standaard worker placement spel. Voor hen zou ik zeker zeggen: pak de uitbreiding erbij voor extra keuzes, nog meer gelaagdheid en om wat asymmetrie toe te voegen. Dit spel is wel een mooie uitnodiging en visite kaartje voor het genre. Een goede gateway voor spelers die een stap willen gaan maken naar iets zwaardere spellen en dit genre. Of voor mensen zoals ik, die ook gewoon prima gedijen bij het niveau van dit spel.
Ik vrees dat het qua thematiek en genre veel mensen aantrekt dit qua moeilijkheid graag boven de 3 spelen. Dan is 2.24 een lage complexiteit. In die zin snap ik de kritiek over het gebrek aan explore mogelijkheden. Ik kreeg ook explore-honger en dát wordt niet ingelost.
Hierdoor heeft het ook het gevaar dat mensen die wel graag rond die complexiteit spelen, het idee krijgen dat de complexiteit van dit spel veel hoger ligt. Zo oogt én klinkt het wellicht ook. En dan valt een spel als dit tussen de wal en het schip. Het bord is wat overwhelming. Maar ik verzeker je dat het niet zo is. Door de gestructureerde fases en gameplay wordt je heel duidelijk door alle verschillende mogelijkheden heen geleid. Ik ben groot fan!


Explorers of Navoria
Players: 2-4
Time: 40-80 minutes
Age: 12+
Author: Meng Chunlin
Publisher: Qiling Board Games
Year: 2024
Here we go again. A worker placement pointsalad with a beautifully hysterical game board: Explorers of Navoria. It will come as no surprise that the goal is to “explore” Navoria and collect as many points as possible.
I’m a little late to the party with this review, but it’s much needed. I’d like to offer some counterpoint to many critics who think there’s too little to explore. Well, if that’s all you want and you’re pinning all your hopes on it given the title of the game, then you’re indeed going to be somewhat disappointed. It’s not really exploring. Exploring implies that you’re constantly discovering something new. And you’re not. You have a straightforward map/playing field that doesn’t change or reveal itself during the game. Exploration should be seen more as walking across the board, which is a completely different meaning of the word. All this criticism aside, and after the necessary expectation management, what remains, in my opinion, is a worker placement game that is well balanced in terms of choices, which does what it’s supposed to do, looks beautiful, and is also highly replayable thanks to changing components on the game board, especially with the expansion. And I’d like to explain why!
I played my first game when I was tipsy at a weekend getaway with fellow reviewers. I must admit that all I could think was: wow, beautiful! Tired as I was, I could hardly concentrate, so I decided to focus on one thing: the cards. Part of this game is set collection. And the cards that were on the table perfectly matched the goals drawn for this game and provided extra income between rounds. My brain capacity at the time was able to handle that, and I won with this single focus. The euphoria turned into a desire to own the game, and so it happened. Another game wasn’t long in coming and… I went down ingloriously. My previous successful strategy didn’t work. And actually, that made sense. I wasn’t doing what you’re supposed to do in a good worker placement game: getting the most out of the changing factors. There were completely different goals, completely different cards, and this game called for a completely different strategy and use of the (equally changeable) workers. Well, then you already know that the creators hit the nail on its head. I love it.
Well, now. How do you manage that?
In front of you, you see a board with different tracks. You can follow these during the game if you manage to activate this action. The tracks earn you points and bonuses during interim scoring, and you build houses on them that give you advantages in subsequent rounds. In the middle, you see different landscapes where resources, points, and actions can be obtained, and on the side of the board, you find cards in different categories, each with their own functions. Resources are important for activating bonuses on your personal player board, which in turn urn extra actions and scoring opportunities. Finally, at the top of the board, you will find various objectives. You only score these objectives if you manage to obtain the correct set of cards in time. If you do so first, you will earn more than anyone who follows.
Explores of Navoria is played in different phases, each of which has its own function. The game consists of three rounds, in which all four phases occur in the same order.
A) Recruit
There are tokens in a bag that correspond to the different colors of the cards. You will use these tokens to indicate which row of cards you want to take a card from. You are dependent on the tokens you draw yourself, but also on the token that your predecessor may have left behind. You can either draw two blind tokens from the bag or take one from the middle of the board. From the two tokens you draw, you choose one and leave one in the middle of the board. The one in the middle of the board becomes a choice/option for the players after you. Place the token you drew on the face-down pile of cards of the corresponding color. There are three cards of that color face up in the market, and you choose one. The different cards have different functions. One color gives you more resources, another gives you points during an interim scoring or at the end of the game, and others let you move forward on the tracks. There are icons on the cards. These icons correspond to the goals of the game. If you want to activate an extra final scoring, you will have to make sets of these icons. When you succeed, you fulfill the condition to score a goal. These goals are always different and always involve combinations of colored cards. These do not necessarily correspond to the icons, so you have to choose strategically. The icons are not necessarily on the colored cards corresponding to the goal drawn for those icons.
So I was lucky in my first game. I saved icons that earned me points in both the interim and final scoring, which met the goals, and the goals required exactly the color cards that most of my icons were on. In that case you have built a powerful machine that scores on all fronts. But now I know that this is the exception rather than the rule, because the game is so ingeniously designed that you have to think much more carefully about your choices.
B) Gather
There is another important factor that plays a role in choosing your tokens. In the next phase, these tokens turn into workers. Depending on the number of players, you take turns in turn order to draw a token and a card. But when this is done, we move on to the Gather phase, in which we take the tokens from the card stacks in the opposite direction and place them on the card to “gather” all kinds of things. You place them on the land with the corresponding color. So if you want to activate a certain action in the B phase, you will have to make sure that such a worker is actually recruited in the Recruit phase and then hope that you are the first to get it. You only play this phase with the workers recruited in phase A. AHA! That explains the name. Here, too, you will see that you have to choose strategically because each country has its own yield, but also decreasing in value. Sometimes several workers of one color are recruited, but the one who plays a color first in this phase will enjoy a higher yield. The order in which you deploy the workers is therefore also important. Do you go for the area with the highest yield first or the one with a lower but necessary yield? The nice thing about this round is that it goes against the player order. The last player from phase A is the starting player in phase B and vice versa.
C) Income
When all workers have been played, you start preparing for the next round. But first, you need to carefully keep track of your points. If you bought cards in the Recruit phase that provide interim income, now is the time to cash in on those cards. This income varies from points for certain icons to, for example, houses you have built on the tracks or the number of flags you have passed on the tracks. The cards remain valid for all rounds and can therefore become more valuable during the game. In this phase, you also receive income from the various tracks. Depending on how far you have progressed on a track, you receive bonuses. These also vary, of course. From points per color card you own to random points. In this game, income represents points. There are no coins or physical money. So don’t be misled by the phase title.
D) Return
This phase is all about getting ready for the next round. There are a few important steps here:
1. Your exploration markers on the tracks go back to the start of the track or to the last house built on the track. Moving along the tracks and building these houses are actions you’ll see on the cards, on the board, and on your personal board. So if you have a house, you start the next round with a head start, unless your fellow players have the same house. Because houses are placed on specific spots on the track, you may even start the next round further along the track than where you ended this round.
2. All tokens are returned to the bag.
3. All markets are refreshed.
4. The player order is adjusted. This last action is tricky. The player who is in the lead may start, followed by the player in second place, and so on. From the perspective that in many games it is advantageous to start first, this seems somewhat unfair. If you are already in the lead, you also get an advantage. Many people take issue with this. However, I personally see it differently. The first player to start has the first chance to grab something. But in terms of probability, this also means the least chance of drawing the desired or hoped-for color. Meanwhile, the last player may already have some nice colors laid out in the middle of the field and the chance of drawing the desired color has statistically increased considerably. Don’t forget that the last player is the first to start placing workers in phase B and can therefore achieve the highest yield in the desired area and has first choice.
After the last round, the return phase is of course no longer played. Instead, you move on to the final scoring. Here, after the income phase, you also count the cards that score in the final scoring and you count the points achieved from the goals. The player with the most points wins.
Materials and personal boards
These require a separate explanation. I can imagine you are now wondering: what are these raw materials for? A logical assumption would be: you use them to build houses. Well, no. But they are related. Everyone has a personal board on which they place the houses to be placed in the game. On your personal boards, you have three spaces for this, which correspond to the three tracks on the field. Whenever you are allowed to place a house in any way, you take one of the houses from your personal board, from the area corresponding to the area where you place your house on the board. The houses on your personal board are linked to a bonus. You unlock this bonus as soon as the linked house from your personal board is moved to the large game board. You don’t receive this bonus immediately, but only when you have collected the right resources. Once you do, you activate unlocked bonuses, which consist of extra steps on tracks, points, or extra houses. If you remove multiple houses (max. 3) in one area and thus unlock multiple bonuses, this can add up considerably. This is because you receive all unlocked bonuses immediately once you have collected the required resources. Exchanging your resources is a mandatory action. This means you cannot collect more resources or wait with the bonuses until a certain phase. The right combination of resources = immediate bonuses. In the game, you have three resources: apples, swords, and crystals. As soon as you acquire resources in the game in any way, you place them on your personal board. Resources are saved per area/track, so they each have their own supply on your board. Each area requires a different combination to activate the bonuses. So you have to look carefully at which area you place your resources. You may never place multiple resources in the same area on your board in a single turn. So if you collect three resources, you must place them all in a different area. Even if you obtain three of the same resources, they must all be placed in a different area/stock.
Expansion: Forgotten Lands
Once you are familiar with the mechanics of the base game, you can choose to add Forgotten Lands. To be honest, I secretly add it right away for experienced players and explain it as if it were the base game. But of course, you don’t have to. What the expansion adds:
Expansion to five players
A solo module
• An extra color of cards, and with it extra color tokens and a new land area, which you add to the game board. These cards do not have icons, but they do have two colors that count separately from each other. This can be tricky in interim scoring and final bonuses.
• Extra resources: contracts. You get these through the new cards and you need them to perform your own extra actions
• Your own capacity, which you draw at the beginning of the game and which gives you extra actions that you can perform in exchange for the contracts. They are linked to specific phases in the game. Examples of bonuses are extra resources or steps on tracks. These actions may only be performed once per round.
• Bonus card: A bonus in the game. Often a starting bonus that allows you to start with a free card or resources, for example, but some also yield something during the game or at the final scoring. Everyone receives a personal card.
• Objective cards: separate from the end scoring objectives that the game already had, you draw a card each round that is scored for each player after each round. The size of your bonus is then based on your performance. So the more you have of something, the more it yields.
• Exploration tiles. These provide new scores for the various tracks. This means that they also become variable and do not only yield points as in the basic game, but can also yield contracts, for example.
• Tokens. At the end of each track, you place a token with one of the icons that you also find on the cards and the goals. The first player to reach the end of a track receives this token and can therefore count it towards their score for the goals.
What do I think?
I think all the sourpusses who think there’s not enough to explore should get over their word barrier, grab the expansion, and play it again. The game is just well put together. Fortunately, many people agree with me. Coherent elements, the horses you have to bet on, the different routes to get there, it’s all balanced and layered. For a more seasoned player who likes heavier games, the basics will be on the simple side and it may feel like a fairly standard worker placement game. For them, I would definitely say: get the expansion for extra choices, even more layers, and to add some asymmetry. This game is a nice introduction to the genre. A good gateway for players who want to take a step towards heavier games and this genre. Or for people like me, who are perfectly happy with the level of this game.
I fear that in terms of theme and genre, many people who like to play games with a difficulty rating above 3 will be attracted to this game. In that case, 2.24 is a low complexity rating. In that sense, I understand the criticism about the lack of exploration possibilities. I also got hungry for exploration, and the game does not completely provide.
This also runs the risk of people who do like to play with that level of complexity getting the idea that the complexity of this game is much higher. That’s how it might look and sound. And then a game like this falls between two stools. The board is a bit overwhelming. But I assure you that it’s not. The structured phases and gameplay guide you very clearly through all the different possibilities. I’m a big fan!